Thursday, October 30, 2014

Ooey Gooey Caramel Apple Oatmeal Bars   


It's been a while since I shared a recipe but oh will you be so happy that I shared this one!  These are absolutely A-MAZING!
 
I've had an awful sweet tooth lately and when I saw this post from Kelly at thelilypadcottage.com,  I knew that I had to try them.  And lucky for me, I had everything on hand. 


Her Caramel Apple Oatmeal Bars look absolutely beautiful and you definitely need to head over to her site and check out her post.  She is a great blogger/inspiration and I am totally in love with her decorating style and house!  She is one of the many bloggers I follow!
 
As you can tell by the pictures, my Caramel Apple Oatmeal Bars didn't quite turn out exactly like hers.  Not sure exactly why but maybe it has something to do with that I may have added a few chocolate chips to make them a little ooey gooier!  Not even sure if you could classify mine as a bar....it's more like a gooey caramel apple oatmeal crisp!  Whatever we call it, it's de-lish!
 
 
Here's my version of her recipe. 
 
Ooey Gooey Caramel Apple Oatmeal Bars
 
Ingredients:
3/4 cup melted butter + 1 tbsp
3/4 cup packed brown sugar
1 cup all-purpose flour
1 tsp baking powder
1 cup oats (I used Quaker Old Fashion)
2 apples, diced ( I used Granny Smith)
1/4 tsp apple pie spice
1 jar caramel sauce ( I used Smuckers.  Of course you can make your own)
1/2 tsp coarse sea salt
1/4 cup chocolate chips (You could also use pecans, raisins.  I just didn't have either of these)
 
Apple Pie Spice:  Mix 4 tsps cinnamon, 2 tsps nutmeg, and 1 tsp allspice.
 
Instructions:
  1.  Preheat oven to 350 degrees.  Sauté apples in 1 tbsp butter over medium heat until soft, about 10 minutes.
  2. Sprinkle with 1/8 tsp apple pie spice.  Remove from heat and add caramel sauce.
  3. While apples are cooking, mix melted butter, brown sugar, flour, oats, 1/8 tsp apple pie spice, and baking soda in bowl.
  4. Spread 1/2 the oatmeal mixture into an 8 x 8 baking dish lined with parchment paper.  Bake for 10 minutes.
  5. Top with caramel apple mixture.  Sprinkle with sea salt and chocolate chips.
  6. Layer remaining oatmeal mixture over caramel.  (My mixture was quite sticky so I used a teaspoon to dollop it on.)
  7. Bake an additional 15 minutes or until golden brown.  (This may vary based on your oven.  I baked for 20 minutes)
  8. Cool slightly and Enjoy!  (Would be awesome topped with ice cream!)
They are super quick and easy to make.  And I promise you that if you make these you will not be disappointed!  They are like a small piece of heaven and I will definitely be making these again and again!
 
Here are a few more enticing pictures! 


Wish you were here to enjoy some of this Yumminess with me!  Please subscribe and your comments are always welcome!


Tuesday, October 28, 2014

Using Old Windows

Transformation Tuesday - Post #6


Happy Tuesday!  Hope you're having a great day! 

Today I thought I'd talk about something near and dear to my heart... old windows.  They can be found in just about every room of our house!  I love them as stand alone wall décor, perched as a backdrop, used as a coat rack, a chalkboard.... and the list goes on and on!  Any "new" old window always has a home in this house! 

A few other great things about old windows....
1.  They come in all sizes.
2.  They are easy to come by in antique stores, flea markets, and yard sales.
3.  And best of all, they are easy on the wallet!  Affordable decorating! (Your husband can thank me now!) 

Here are some of the ways that I've transformed an old window and they can be seen in our house!

This one has a home in our foyer perched atop the cedar armoire.  It's a beautiful backdrop to all the other "goodies" up here.


This one you'll find hanging over the bed in our master bedroom.  It's dressed with just a simple "twiggy" wreath and a burlap bow.


Another one hangs in the laundry room.  I added a few small hooks (found at Lowe's) and another "twiggy" wreath.  Can you see a trend with the wreaths?!  I love the contrast of the natural tone of the wreath with the white window!


And this one (which happens to be my favorite) can be found hanging over the dresser (another DIY transformation) in our guest room.  I hung it horizontally, adding a shabby chic shelf, coat hooks, and a mirror.  Let me show you how I did that.....


This window I found at an antique store some time back for $5.  Of course it needed a good cleaning which also meant removing flaking paint.  (It's pretty evident that I should have used a drop cloth here but oh well....)


I started with a couple of shelf brackets that I purchased at Lowe's (around $3 ea) and a 1x8 board cut to fit across the top (or side, whichever way you want to look at it).  I  had the board in my scrap pile but it too can be purchased at Lowe's and they will cut it for you. (There are four brackets in these pictures and you'll see how I used the other two as you read on....)

 
I stained the brackets and shelf with Minwax in Provincial.  Once they were dry, I added a light coat of white ceiling paint not covering them completely. 


Next, I added some "G ring" picture hangers to the back of my window.  Added the coat hooks and then attached the shelf brackets using a couple of screws and the inset hanger found on the back of the bracket.  I then secured the shelf across the top using wood screws.


 And that's it!  A very simple and easy project but what an impact!


And here is how I used the other two brackets.....  This one I haven't hung yet but it will have a home real soon!


Here are a few other ideas from Pinterest for using old windows....


(What a great idea for a window missing the glass!)


 Hopefully you've found some inspiration to hang (or prop) a few old windows around your house.  I'd love to hear or see how you've used them!  Take care and have a great rest of the week!. 

P.S.  Next week I hope to start sharing some Christmas ideas with you!  It'll be here before you know it!


Tuesday, October 21, 2014

Faux Pallet Gate

Transformation Tuesday - Post #5


Today I thought I'd share an easy peasy tutorial with you.  I gave you a sneak peak of it last week when I shared my cabinet door turned coat rack.  Which by the way, I'm still loving!  (And you'll see in some of the pictures that I've been decorating that little spot in our foyer.)

Using a few pallet boards I built this awesome faux gate that now hangs in what was a huge empty wall in our foyer.  I am so happy with it!  It makes such a statement when you walk in the front door and is a great compliment to the coat rack!  AND it only cost $12 to build!


Now, let's talk about just how easy this really is to do!

Step 1.  Cutting up the pallets.  I started with a couple of pallets just like this one.  Broke out the sawzall and began taking them apart.  The sawzall cut right through the nails on the ends but I had to use a nail pry bar and hammer to remove the nails from the middle section.  And of course some of the boards split when prying/beating on them.  Oh well.... what is a girl suppose to do but tear apart another one.  It took a couple of pallets to get enough "good" wood to create the faux gate but it happened.

This is the step that took the longest.  And it was definitely a workout!  But "Girl Power" prevailed and got the job done!


Step 2. Attaching the boards.   I laid out my boards in the pattern that I wanted and dry fitted so to speak my horizontal boards across the top and bottom before measuring and cutting them.  All pallet boards are not created equal so it's important to measure both top and bottom.  I used a nail gun to attach the horizontal boards across the top before turning the gate over and using wood screws to make sure everything was good and secure.


Step 3:  Paint.  I used slightly watered down ceiling paint and dry brushed the middle of each board.  I love ceiling paint because of it's great coverage!  This took all of 15 minutes at most. 

 
 Step 4.  Add hardware.  I added two 5 1/2" hinges that I purchased at Lowe's to the horizontal boards.  I looked for some old hinges at a few local antique stores but couldn't find any...  Oh well, these work just fine and they were only $6 each.  I guess I could have tried to make these look at little aged by spray painting and sanding them but it really isn't that big of a deal to me.  I may do it later but I doubt it.  I then added two large D ring picture hangers to the back.


Step 5.  Hang and Enjoy!  I used two heavy duty wall anchors to secure it to the wall (because of course there weren't studs where I wanted it).  It's pretty heavy! 


 And that's it..... Easy Peasy!  For now, I added a fall wreath but I have lots of ideas in my head about how to decorate it from season to season, especially as Christmas quickly approaches.  By the way, I've been working on a ton of Christmas projects and I'm excited about sharing some of them in the next few months!

Hope you're having a great day!  Take care and thanks for stopping by!

Tuesday, October 14, 2014


From Cabinet Door to Coat Rack 

Transformation Tuesday - Post #4


Hello Everyone!  How's things in your world?  Mine you ask ...chaotic, hectic, but good!    I am feeling very blessed these days!
 
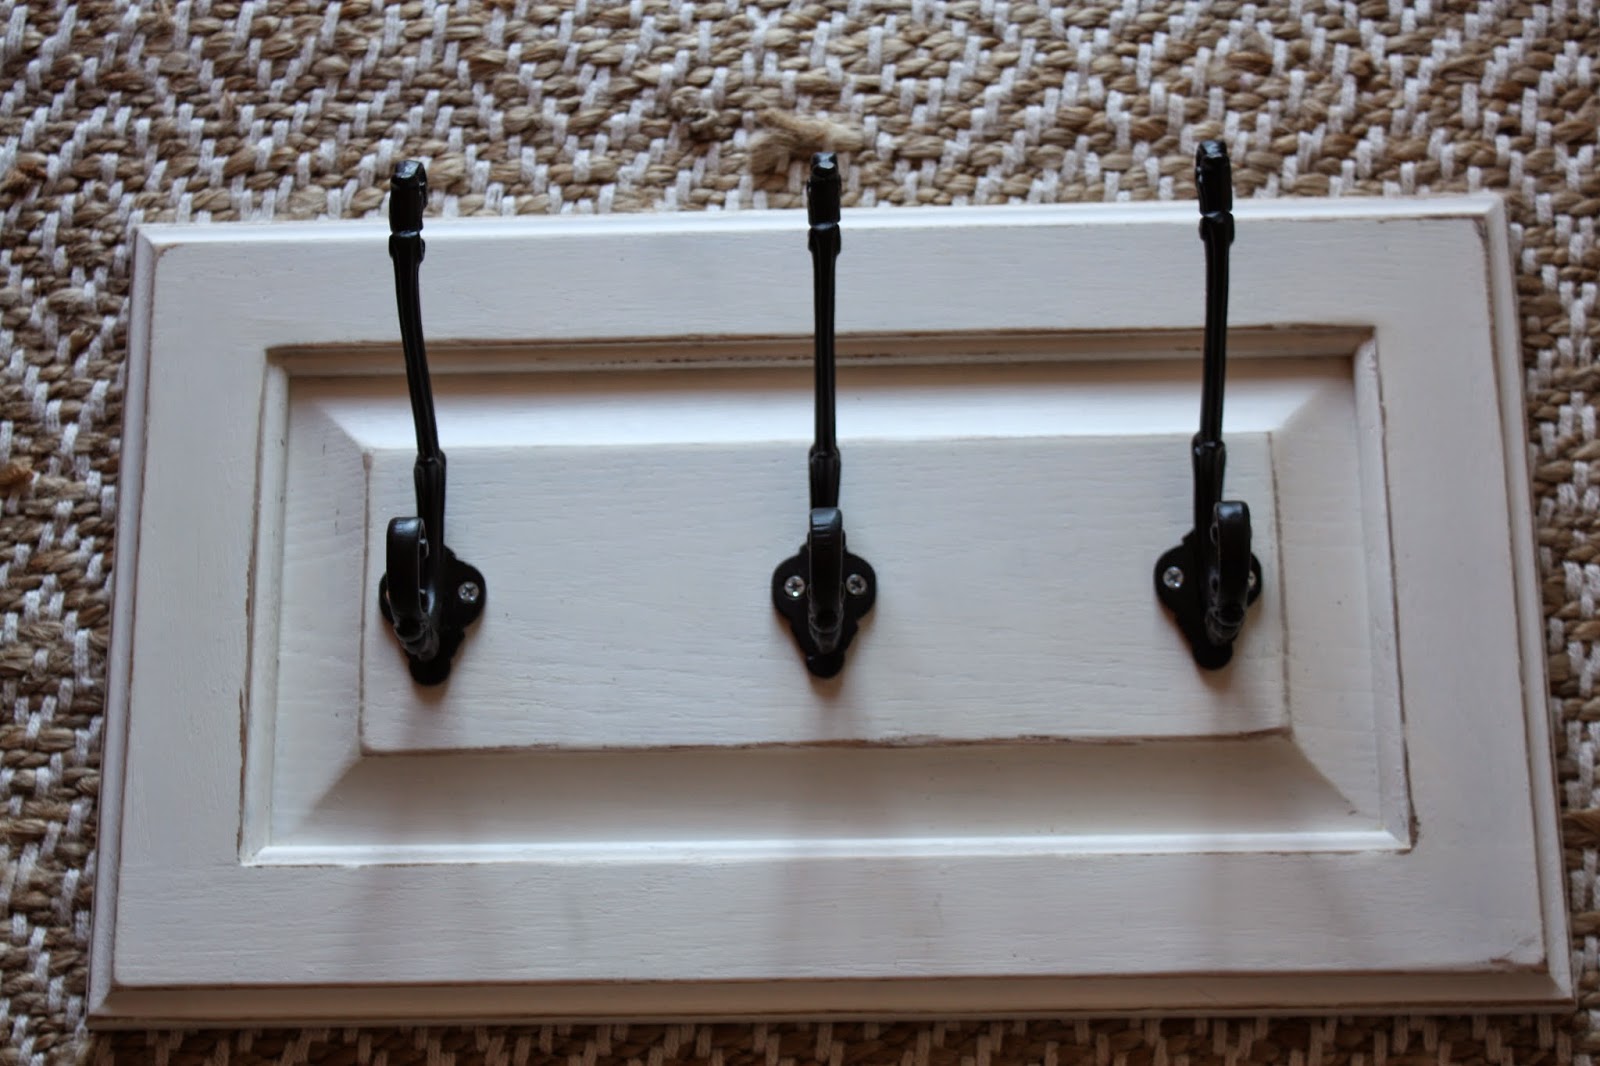
I did manage to finish up a few projects last week (even in my world of chaos) and one of those I'll be sharing with you today!  I bought this cabinet door at one of the local antique stores for $5.00.  It's definitely not an "antique" (or even old) but for this project we'll pretend that it is!


The first step in this transformation was to clean it up really good (it was kinda yucky!)  with some good ole' Mean Green cleaner and a rag!  Once it was dry, I used Elmer's stainable/paintable wood filler to fill in the hole where the handle use to be.  After it dried (which doesn't take long), I sanded the entire door with 120 grit sand paper using my hand sander.  You certainly can sand it by hand.  The goal is just to knock off some of the shine.


I then painted it with Valspar Birchwood White.  (Wow, no spray paint!)  I did mix a little chalk paint powder in with my paint so it would have the texture and smooth finish of chalk paint.  Chalk paint also works great on unprimed surfaces.  It took two coats.
 
After the paint dried, I distressed it using more 120 grit sand paper, wiped it down good, and waxed it with a clear wax.


I added a couple of hooks to the back.  It's so much easier to add them now before attaching the coat hooks.
 
 
I purchased these 3 coat hooks at Hobby Lobby for $3.00 each.  I always check their ad and buy hooks, handles, and knobs when they have them 50% off (which I think is about every other week).  They also usually have a great selection!


 The one disadvantage with Hobby Lobby's hooks, handles, and knobs is that most do not come with hardware.  These three hooks did not come with screws so and I rounded up a few that would fit.  And of course they were silver in color. 

 
It's a quick fix though!  I pulled out my black acrylic paint and quickly dabbed it on the screw heads.  This is a little trick that works great every time.  I have also used a black sharpie and it works too! It doesn't cover as well as the paint but will work in a pinch (especially when you don't have any black paint on hand) !


From Cabinet Door to Coat Rack!  I love it!  It found a home in the foyer just inside the front door next to my faux repurposed pallet gate (I'll be sharing the DIY on that later on).  The keys I found at Marshall's sometime back and they look quite perfect hanging from one of the hooks!


And of course, it needed a little scarf too!


In case you haven't already done the math, I spent a total of $14 on this jewel.  The next time you're out thrifting or antiquing, look for a cabinet door or two! 
 
Happy Tuesday!  Thanks for spending some time with me today!  
 
 
P.S.  I apologize for some of the not so great pictures!  The weather has been pretty crummy here and getting good natural light has been almost impossible!