Showing posts with label Makeovers. Show all posts

Tuesday, November 18, 2014

Faux Mercury Glass

Transformation Tuesday - Post #8


First up.... let me just say I am so sorry if you were looking for a Transformation Tuesday post last week.  I promise you... I have a great reason!  Mr. LAHWJ hurt his back while working in Afghanistan and came home unexpectedly last Wednesday.  It put quite a kink in my plans for last week so I had to squeeze a lot into Monday and Tuesday.  Thankfully, he's doing okay (and I am so happy that he's home) but I see a lot of doctor visits in our near future!  I am also playing chauffeur.... Oh, but just wait until he gets my bill for chauffeur services.  Lol!
 
I love mercury glass and if you've been in Homegoods, TJ Maxx, or Marshal's lately you'll find tons of mercury glass vases, candleholders, etc. lining their shelves for the holidays.  Most also come with a hefty price tag!  This week I thought I'd share a quick and easy tutorial showing how to create your own faux mercury glass. 
 
Here are the supplies that you'll need:
 
Painter's tape
Mirror Image (Rustoleum) or Looking Glass (Krylon) spray paint
Gold Metallic spray paint
Glass Vases, Candleholders, etc
Spray bottle (mixture of 1/2 water and1/2 vinegar)
Paper towels (or rag)
Scrap paper

  
Step 1:  Make sure your vases, candleholders, containers are clean.  I had several of these stashed in the attic and a few I picked up at the dollar store.

 
Step 2:  Tape off the outside of the container using painters tape and scrap paper. (The Mr. complains that I save everything but sometimes it pays off.)

 
Step 3:  Spray the inside of the container with the water/vinegar mixture. 
 
Step 4:  Spray a few quick light squirts of the mirror image paint all around the inside of the container.  Pour off any extra water using the paper towels or rag.

 
Step 5:  Allow to dry a minute or two and repeat steps 3 and 4 until you reach the desired effect.  I sprayed these vases, etc. with three coats.  I didn't want the glass to be completely covered.  I really like just a hint of the mirror image.

 
Step 6:  Finally, spray the container with the water/vinegar mixture and a few light squirts of the gold paint.  This will leave just a slight hint of the gold.  If you prefer more of a gold look, spray a few coats of the gold paint before using the mirror image spray.

 
Step7:  Allow to dry completely.  Remove the tape and paper. 
 
All done!


 I love the mix of silver and gold.  The gold is very muted and adds a nice touch to the primarily silvery Christmas thing I've got going on. 
 
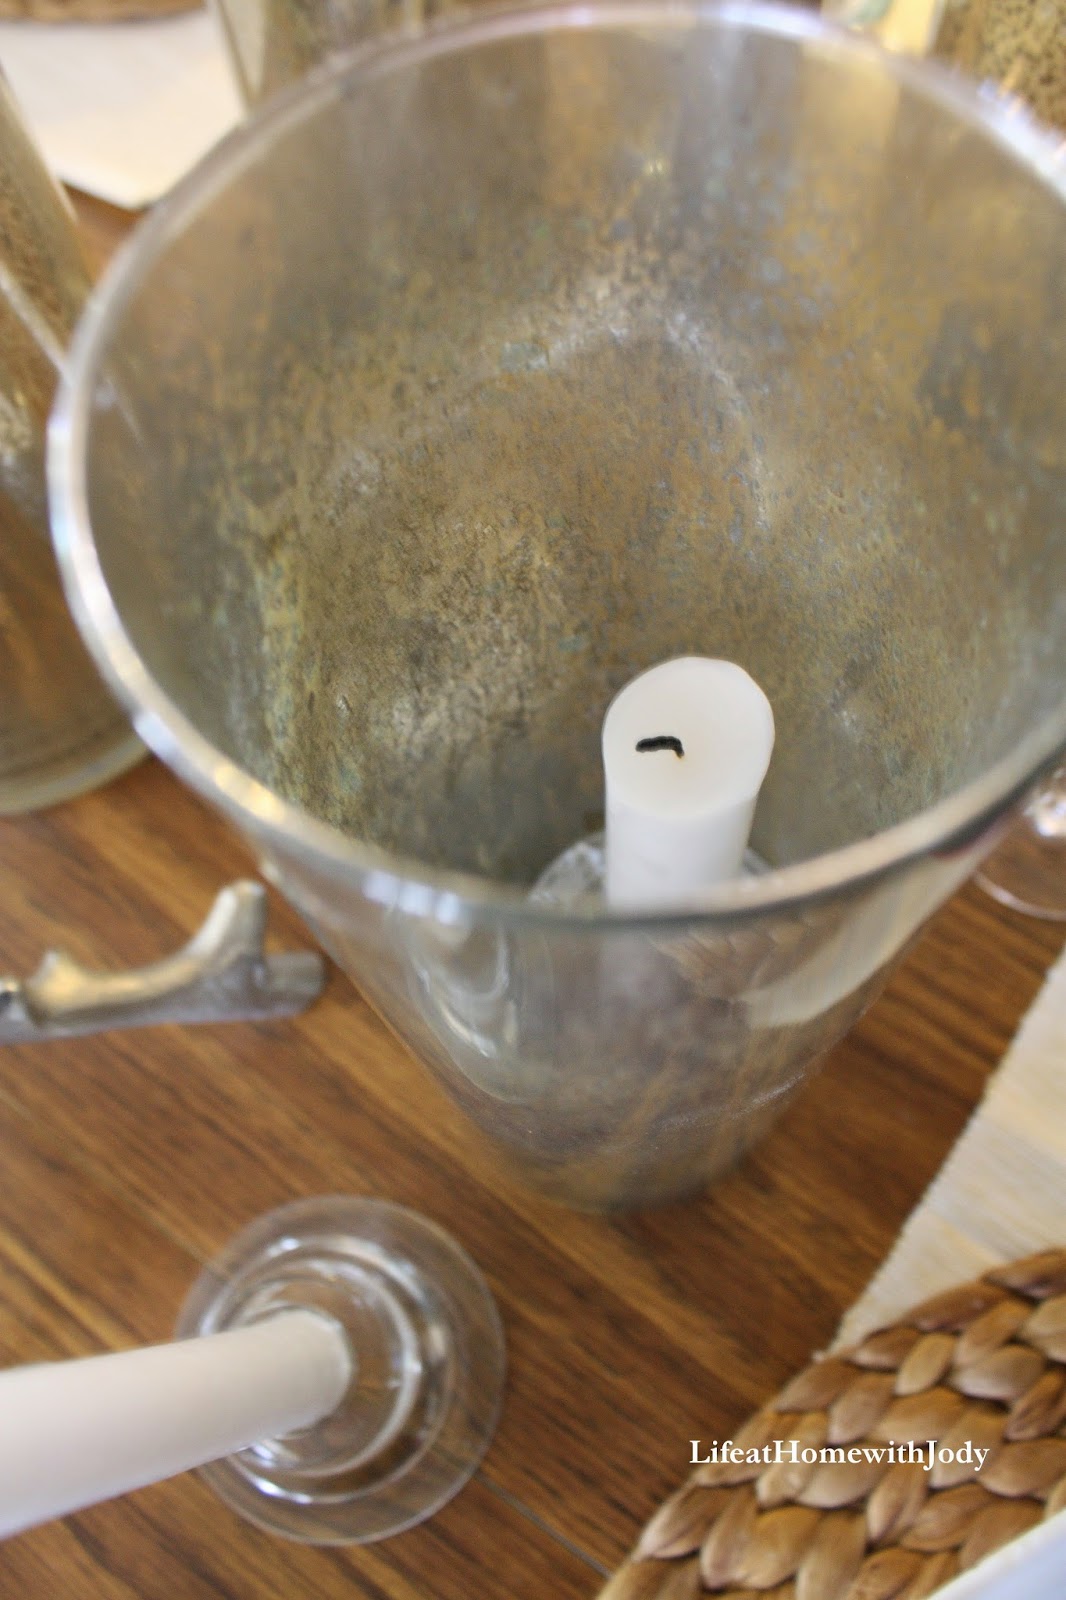
I added several of them with a mixture of other candleholders to our dining table as a centerpiece.  They are beautiful lit up at night!  I love the mix of the silver antler candleholders, the large mercury glass cylinders, small votive holders, and glass tapered candle holders. 


I will also share with you a little strategy that I use to keep from buying those expensive tall candles.  I turn a small candle holder upside down inside the larger cylinder and use a smaller candle.  It's the perfect height.   I also used tapered candles inside a few of the cylinders.  You could also fill the cylinders with Epsom salt. 


And here's one more picture of the faux mercury glass pieces being used as a vase.  I love how it looks next to the mercury glass lamp on our nightstand. 


It's perfection in my book and I love the money I saved doing it myself! 
 
Happy Tuesday!
 
Jody


Tuesday, October 28, 2014

Using Old Windows

Transformation Tuesday - Post #6


Happy Tuesday!  Hope you're having a great day! 

Today I thought I'd talk about something near and dear to my heart... old windows.  They can be found in just about every room of our house!  I love them as stand alone wall décor, perched as a backdrop, used as a coat rack, a chalkboard.... and the list goes on and on!  Any "new" old window always has a home in this house! 

A few other great things about old windows....
1.  They come in all sizes.
2.  They are easy to come by in antique stores, flea markets, and yard sales.
3.  And best of all, they are easy on the wallet!  Affordable decorating! (Your husband can thank me now!) 

Here are some of the ways that I've transformed an old window and they can be seen in our house!

This one has a home in our foyer perched atop the cedar armoire.  It's a beautiful backdrop to all the other "goodies" up here.


This one you'll find hanging over the bed in our master bedroom.  It's dressed with just a simple "twiggy" wreath and a burlap bow.


Another one hangs in the laundry room.  I added a few small hooks (found at Lowe's) and another "twiggy" wreath.  Can you see a trend with the wreaths?!  I love the contrast of the natural tone of the wreath with the white window!


And this one (which happens to be my favorite) can be found hanging over the dresser (another DIY transformation) in our guest room.  I hung it horizontally, adding a shabby chic shelf, coat hooks, and a mirror.  Let me show you how I did that.....


This window I found at an antique store some time back for $5.  Of course it needed a good cleaning which also meant removing flaking paint.  (It's pretty evident that I should have used a drop cloth here but oh well....)


I started with a couple of shelf brackets that I purchased at Lowe's (around $3 ea) and a 1x8 board cut to fit across the top (or side, whichever way you want to look at it).  I  had the board in my scrap pile but it too can be purchased at Lowe's and they will cut it for you. (There are four brackets in these pictures and you'll see how I used the other two as you read on....)

 
I stained the brackets and shelf with Minwax in Provincial.  Once they were dry, I added a light coat of white ceiling paint not covering them completely. 


Next, I added some "G ring" picture hangers to the back of my window.  Added the coat hooks and then attached the shelf brackets using a couple of screws and the inset hanger found on the back of the bracket.  I then secured the shelf across the top using wood screws.


 And that's it!  A very simple and easy project but what an impact!


And here is how I used the other two brackets.....  This one I haven't hung yet but it will have a home real soon!


Here are a few other ideas from Pinterest for using old windows....


(What a great idea for a window missing the glass!)


 Hopefully you've found some inspiration to hang (or prop) a few old windows around your house.  I'd love to hear or see how you've used them!  Take care and have a great rest of the week!. 

P.S.  Next week I hope to start sharing some Christmas ideas with you!  It'll be here before you know it!


Tuesday, October 21, 2014

Faux Pallet Gate

Transformation Tuesday - Post #5


Today I thought I'd share an easy peasy tutorial with you.  I gave you a sneak peak of it last week when I shared my cabinet door turned coat rack.  Which by the way, I'm still loving!  (And you'll see in some of the pictures that I've been decorating that little spot in our foyer.)

Using a few pallet boards I built this awesome faux gate that now hangs in what was a huge empty wall in our foyer.  I am so happy with it!  It makes such a statement when you walk in the front door and is a great compliment to the coat rack!  AND it only cost $12 to build!


Now, let's talk about just how easy this really is to do!

Step 1.  Cutting up the pallets.  I started with a couple of pallets just like this one.  Broke out the sawzall and began taking them apart.  The sawzall cut right through the nails on the ends but I had to use a nail pry bar and hammer to remove the nails from the middle section.  And of course some of the boards split when prying/beating on them.  Oh well.... what is a girl suppose to do but tear apart another one.  It took a couple of pallets to get enough "good" wood to create the faux gate but it happened.

This is the step that took the longest.  And it was definitely a workout!  But "Girl Power" prevailed and got the job done!


Step 2. Attaching the boards.   I laid out my boards in the pattern that I wanted and dry fitted so to speak my horizontal boards across the top and bottom before measuring and cutting them.  All pallet boards are not created equal so it's important to measure both top and bottom.  I used a nail gun to attach the horizontal boards across the top before turning the gate over and using wood screws to make sure everything was good and secure.


Step 3:  Paint.  I used slightly watered down ceiling paint and dry brushed the middle of each board.  I love ceiling paint because of it's great coverage!  This took all of 15 minutes at most. 

 
 Step 4.  Add hardware.  I added two 5 1/2" hinges that I purchased at Lowe's to the horizontal boards.  I looked for some old hinges at a few local antique stores but couldn't find any...  Oh well, these work just fine and they were only $6 each.  I guess I could have tried to make these look at little aged by spray painting and sanding them but it really isn't that big of a deal to me.  I may do it later but I doubt it.  I then added two large D ring picture hangers to the back.


Step 5.  Hang and Enjoy!  I used two heavy duty wall anchors to secure it to the wall (because of course there weren't studs where I wanted it).  It's pretty heavy! 


 And that's it..... Easy Peasy!  For now, I added a fall wreath but I have lots of ideas in my head about how to decorate it from season to season, especially as Christmas quickly approaches.  By the way, I've been working on a ton of Christmas projects and I'm excited about sharing some of them in the next few months!

Hope you're having a great day!  Take care and thanks for stopping by!